Thursday, September 29, 2011

Oatmeal Raisin Cookies

I started this post last week (during sugar week), but life got in the way as usual and I just now found it.  My mother would say "it's a good thing your head is attached or you'd surely lose it."  Yep, Mom, you are right again!


The recipe made close to 40 mini cookies, but
by the next morning, this is all that remained.  Like any good
mother, I hid them and ate the rest sneaking them one by one.

Oatmeal raisin cookies are my absolute most favorite cookie, and my favorite of all oatmeal raisin cookies is Smitten Kitchen's version.

The recipe goes like this (with my modifications in red)

1/2 cup (1 stick or 4 ounces) butter, softened
2/3 cup light brown sugar, packed 1/3 cup evaporated cane juice
2 tsp. molasses
1 egg
1/2 teaspoon vanilla extract
3/4 cup all-purpose flour 3/4 cup whole white wheat flour
1/2 teaspoon baking soda
1/2 teaspoon ground cinnamon
1/4 teaspoon salt (I often use a half teaspoon, but I like more salt in my baked goods)
1 1/2 cups rolled oats
3/4 cup raisins
1/2 cup walnuts, chopped (optional) I skipped these because I cannot get those daycare kids to like walnuts.

Preheat oven to 350°F (175°C).

Cream together the wet ingredients.  In a separate bowl, combine the flour, soda, cinnamon and salt.  Add the dry ingredients to the wet and when well incorporated, fold in the oats, raisins and walnuts if you get to use them.

Bake 10-12 minutes on a prepared cookie sheet (either greased or lined with parchment paper).  Allow to sit for a couple minutes before removing to a cooling rack.

I was worried that there wouldn't be enough sugar, but much to my delight, they were still awesome and everyone loved them.  No one said a word about them not being sweet enough.  Why have a been waiting so long to do this.

Week 38: Rice

With the switch to whole wheat flour, I tried to switch everything to whole grains and succeeded for the most part.  I parted ways with my Minute Rice, which always came out wonderfully fluffy and bought 10 pounds of brown rice.  Well, there must be a serious learning curve with brown rice because I always had one of two results.  Either the rice was crunchy despite the liquid being absorbed or the liquid was absorbed and I had a mushy glob of starch substance.  Neither was really appetizing, as my family so lovingly pointed out. :(

I had kind of given up on rice.  I made a decent chicken Rice-A-Roni knock off.  The flavor was spot-on, but the texture of the rice was an issue.  Due to some unforeseen circumstances, we've found ourselves on the short end of money lately and I asked for help on my favorite forum to come up with ways to use that brown rice (as I still had several pounds left).  Michelle from Recipes from Michelle's Kitchen, came to my rescue when I mentioned that I had trouble getting my rice to be done and not sticky.  Here is her recipe.

IT IS BAKED!  Who knew?  My first time I had a little trouble because I couldn't get a tight seal on my baking dish, so the liquid evaporated and my rice still wasn't done.  Now, I use my oven safe skillet with tight fitting lid and it works like a charm.  Over the past two weeks I've come up with several ways to use this baked rice in all my dishes.  Here are a few.


Green rice with meatloaf and steamed broccoli

Green Rice, aka cheesy broccoli rice-Bake plain rice and when it is done, add cheese sauce and chopped broccoli.  Return to oven for a few minutes to heat through.  It was awesome the first night, but it didn't reheat well, so I will mess with the recipe a bit more.

Chicken Rice-A-Roni-Add seasonings to rice and cook in chicken broth instead of water.  I served this with homemade chicken nuggets, but it would also be good to chop up some leftover chicken and stir it in.

Spanish Rice-I've done this two ways and my preferred method is to make plain rice and let it cool.  I did a double batch and stuck half in the fridge until I was ready to use it.  Saute onions and minced garlic in a small amount of butter or oil until translucent.  Add 1/2 cup or more salsa (I personally prefer black bean and corn) to the skillet and warm through.  Add rice and stir salsa mix throughout.  Heat through.  You can top with shredded cheese and sour cream.  That's what we did with the leftovers and it was delish!

Tuna and Rice Casserole, like tuna noodle casserole only rice.  I make the same sauce as for the noodle version (only now I don't use cans, I use the pouch tuna).  Pour it over the baked rice and stir.  I grated some parmesan over the top and the daycare kids happily scarfed it down, even my son who cannot stand rice.  Wonders never cease!

Fried Rice-a wonderful way to use leftover rice.  Chop onions and a bit of garlic and saute in oil.  Add peas and carrots (I use frozen) and heat through.  Add rice in and stir it all up.  Scrape the rice to the side of the pan and scramble 2 eggs on the empty side.  When the eggs are about 2/3 cooked, stir them into the rice.  Add soy sauce to taste.  It was by far the best fried rice I've ever made (Minute Rice days included!).

On the menu for tonight is stuffed pepper cup casserole.  I tried it earlier in the crockpot and it was ok, but now that I've got the rice thing solved, I want to try again!  I'll post a picture tomorrow.

Wednesday, September 21, 2011

Project Lunch Box

I'm linking up with Project Lunch Box, part of the Family Fresh Cooking Blog.  They have tons of ideas for packing lunches and are winding up an EasyLunchBoxes giveaway.  I can always use more of those containers!
Here's the link.

Tuesday, September 20, 2011

Week 37: Sugar

I didn't post this week's challenge yesterday because I still hadn't come to terms with it.  But, since it's the big elephant in my healthy eating closet, I might as well address it.  It's sugar (hanging my head in shame)!  For months, my family's sugar consumption has been in the back of my mind.  For the most part I shrugged it off by saying that we didn't eat THAT much sugar.  Besides, we do so well on so many things, I really don't need to monitor our sugar intake that closely. 

Sadly, Saturday morning the facts were staring me in the face.  I dumped the last of our sugar bucket into the canister.  You may remember when I made my first bulk purchase.  I went back to check the date.  It was March 12th that I bought 50 pounds of evaporated cane juice.  So, in slightly more than 6 months, my family (and daycare kids) have consumed 50 pounds of sugar.  Eek!  Of course that doesn't include the already prepared foods we buy whether they be bags of tortilla chips, a candy bar or the dozen donuts that my husband will dive 20 miles for at 5:30 in the morning just for his "fix."

Just the thought of consuming 50 pounds of sugar makes me nauseous.  I was so distraught about it that I brought it up to Hubby.  He said, "Well that's only 10 pounds each."  Yeah, no help there.  Since Saturday, I've been thinking of ways to reduce our sugar intake.  I don't plan to eliminate it completely because I value my marriage and I know full well that sweet tea ranks higher than me any day.  Even if it's not gone completely, there are a number of things I can do and I think most are things that my family won't notice (I find that those are the best changes.).

  1. Whatever the amount of sugar is in a recipe (or the amount I use), cut it in half.
  2. Use maple syrup and honey where applicable.
  3. Make/eat fewer sweets.
  4. Incorporate whatever sweets we are eating into the meal, rather than eating them separately, ie. a muffin with a scrambled egg for breakfast rather than a bowl of ice cream before bed.
This week I'll be experimenting with a few "sweet treats" recipes and I'll be making those with less sugar.  Reviews will follow.

Friday, September 16, 2011

Tortillas


Last night it was as if the clouds parted, a choir of angels descended and began singing, "Hallelujah! Hallelujah!  She did it.  Made tortillas!  Hallelujah!!!"  Ok, I might be exaggerating a tad, but seriously my quest for decent from scratch tortillas has been a multi-year quest.  It has finally come to an end.

I have tried several recipes and while they were all tasty, I hadn't found "the one."  Most of the time, I couldn't get them rolled thin enough and they ended up being more like flatbread than a tortilla.  I posted my problem on the kitchen forum on Diaperswappers a while back and Nikki offered her recipe.  It was super simple, required no special ingredients, was whole wheat... what more could I ask?  Tortilla making has been on my "to do" list for a while and last night I finally got around to making them.  The dough mixed up very easily, and rolled out really well.  I don't think I had my skillet hot enough for the first couple tortillas, but once I got going it was super easy.  While I had one cooking in the skillet, I rolled  the second and so on.   Once I was finished, I made myself a bean and cheese quesadilla that was so yummy.  It was just refried beans, cheese and tortilla.  Please do keep in mind that it was nearing 9 pm and I still hadn't eaten, so that could've been part of the reason it was soooo good.

I bagged those bad boys up in a Ziploc bag and into the refrigerator they went.  I was a bit worried this morning when I pulled them out and there was condensation all over the bag (oops, didn't let them cool completely), but when I got them in the pan this morning for sausage, egg and cheese quesadillas, they crisped up nicely.  I also had a little extra spaghetti meat from earlier this week and thought, "Heck, why not?"  So I made up some egg, meat and cheese burritos.  Now, it's not something I would have every day, it wasn't half bad.  I added extra cheese and we all know that cheese makes everything better!

So, without further adieu, I present my tortilla recipe (and Nikki's and anyone else who might have decided to try it)!  LOL

2 cups whole wheat flour
1/2 tsp. salt
3 Tbsp. oil (I used EVOO)
2/3 cup warm water

I placed the flour and salt in my food processor and gave it a quick whirl to combine it.  Then I drizzled in the oil, followed by the water.  The dough was slightly sticky when I pulled it out of the processor, but a quick dusting of the counter and kneading it a couple of times, it became very workable.  I rolled it into a ball, placed it in a bowl, covered it with a towel and let it sit on the back of the stove for 20 minutes. 

When the 20 minutes was up, I scooped the dough out of the dough and kneaded it a few times.  Then I separated the dough into equal portions.  I even went so far as to weigh the dough and divide it into 11 equal portions (but you definitely don't have to do that)!  Roll each portion into a ball and place on a plate, cover and let rest for 20 minutes.  I just threw them together in a pile on a salad plate and well they REALLY stuck together.  In the future, I will be sure that the dough balls don't touch.

OK, 20 minutes is up and you are ready for some tortilla making.  Let your ungreased skillet get hot, and by hot, I don't mean warm, been there done that!  Take a ball of dough out and on a lightly floured surface roll it out to a 6-8 inch circle.  I didn't need to flour the counter, they weren't sticking so I skipped that part.  Also, my tortillas weren't really circles, but I figure  practice makes perfect on that.

Lay the tortilla in the skillet and grab another piece of dough to roll out while you count to 20.  Flip the tortilla in the skillet, continue rolling and count to 20 again.  Remove the tortilla from the skillet and place on a plate and cover with a towel.  Place the tortilla you've been rolling into the skillet and start all over.  Toward the end, my skillet was hot enough that it only took 15 seconds to adequately cook a side, so I was speed rolling to keep up, but all of them managed to get done and I didn't burn any (surprise, surprise)!

Tuesday, September 13, 2011

McGriddles Knock-off

I can't say that I've ever had one of those McDonald's McGriddle sandwiches since I'm a Dollar Menu kind of gal, but the idea of a pancake sandwich has always appealed to me.  This morning when I was making mini pancakes, I was struck with the urge to experiment.  Wow, am I glad I did!

I altered my regular pancake recipe a bit and came up with this.

1 cup whole white wheat flour
2 tsp. baking powder
1/4 tsp. salt
2 Tbsp. maple syrup
1 cup milk (if I'm doing dairy free, I use rice milk, but today I used regular whole milk)
2 eggs
1/2 cup of pork sausage, already browned and drained

I measure the dry ingredients into a mixing bowl and then measure out the wet ingredients. I have a measuring cup with graduated measurements, so I use the 2 cup one and add the milk then eyeball the maple syrup (2 tablespoons is 1/8 of a cup or halfway between 1 and 1 1/4 cup if I'm using my measuring cup. :) ).  Then, I add the eggs and whisk it around to break up the yolks before dumping all of the wet ingredients into the dry.  Whisk until everything is pretty well combined.  If you have a few lumps, don't worry about it.  Fold the sausage into the batter.  I suggest using something besides your whisk or you'll end up with sausage pieces stuck in the middle of the whisk.  I know this happens yet I do it every time!  Sometimes, I am a seriously slow learner!.

Get your griddle or skillet hot.  I have a cheapy one, so at 250 degrees, mine will burn the first batch but undercook the second.  Then I have to turn it up to 300.  So, use whatever temperature works for you (or read the directions if you are REALLY aren't sure-I try to limit that to emergency situations only though).  Using a 1/4 cup measuring device, I have a scoop, ladle out the batter on to the griddle.  You can do as many as will fit in your space.  When bubbles start to form on the top, pop and stay open, the pancakes are ready to flip.  Depending on how much sausage was in each pancake, I noticed that some didn't get the number of bubbles they usually do, so then I watched the edges of the pancake and flipped it when the edge was golden brown and started to lift away from the griddle.  Cook the second side 3-4 minutes or until it is golden brown as well.  This time I made half a batch and it made 6 four inch pancakes, so I'm guessing that a regular batch would make 12-at least that's what one would think.

While the pancakes are cooking, I cooked my egg for the middle of my sandwich.  I found a bowl that was the relatively the same size as the pancakes and generously sprayed it with olive oil spray.  Then I cracked one egg in the bowl, added a bit of salt and pepper and whisked it all together with a fork.  The bowl went into the microwave and 1 minute later I had a perfect circular egg "patty" for my pancake sandwich.  I grated some cheddar cheese on top of the egg and returned it to the microwave for 10 seconds and then left it in there while my pancakes finished cooking.  When the pancakes were finished, I scooped the cheese covered egg out of the bowl and placed it on the bottom pancake.  I topped it with a second and voila-a McGriddle. 

I think it tasted wonderful.  The only thing I am wondering about is if in the actual McDonald's sandwich, the pancakes are crisp on the outside.  Mine were a little spongy, like pancakes are.  But, I'm thinking that if I were to freeze them and then toast the pancakes to thaw instead of microwaving them, that it would crisp them up nicely.  Whatever the case, I thought it was yummy.  I froze enough for 2 more sandwiches and I hope to get the girls to try it out before school tomorrow.  I'll update with their feedback.

Chocolate Zucchini Cookies

I've decided (out of necessity) to cook mostly from the pantry this week and next week too, if I can pull it off.  So, as snacktime was looming, I was desperately trying to come up with something new and exciting (with ingredients already on hand) to eat.  I located a zucchini in the back of the fridge that needed to be used and I know the kids wanted cookies-they always want cookies.  A hunt on allrecipes.com was on!  Right away I came up with this recipe for Chocolate Zucchini Cookies.  After reading through the reviews, I came up with my own version.


1/2 cup coconut oil
2 eggs
2/3 cup sugar
2 Tbsp. molasses
1 tsp. vanilla
1 tsp. baking soda
1/2 tsp. salt
2 1/4 cups whole white wheat flour
1/3 cup cocoa powder
2 cups shredded zucchini
1 cup of chocolate chips

Mix the wet ingredients.  Mix the dry.  Add the dry to the wet and then fold in the zucchini and chocolate chips.  Now, if you use my method, you will just dump it all together and mix it up.  I find that it still turns out fine.  I probably didn't use a full cup of chocolate chips, I just dumped the last chips out of two bags and then chopped up the lone semi-sweet baking chocolate block that I've have for eons.  It was more than enough.

The dough was really dry and crumbly due to the coconut oil solidifying when I added the flour from the freezer.  I just kept folding in the zucchini and eventually the moisture of the zucchini prevailed and I had a nice dough-almost too moist even.

Bake 8-10 minutes in an oven preheated to 350 degrees.  I used a tablespoon scoop and the recipe made about 55 cookies.  It was enough for 3 each for all of the daycare kids and my kids and they will go in lunches tomorrow and I'll still have some to freeze for a picnic lunch on Saturday.  Pretty cool in my opinion.

The kids loved them and even complained when I cut them off at three cookies each.  This recipe if for sure a keeper!

Monday, September 12, 2011

Week 36: Bye Bye Shredded Cheese

Just when I think that I'm doing good, someone comes and bursts my bubble!  I should know by now that every single thing I buy needs to be scrutinized, yet I still give items the benefit of the doubt and I shouldn't.  The latest example is shredded cheese.  Every 3-4 months one of our local grocery stores will have 6-8 ounce bags of shredded cheese on sale for $.97 with no limit.  Woo-hoo!  I love cheese.  A lot.  So it would be nothing for me to go in and buy $30-50 worth of cheese depending on how much money I had in the budget.  I would freeze it and pull a bag as I needed to. 

My cheesy life was all grand until one day a couple weeks ago when someone on a forum that I frequent asked about the potential savings of block cheese versus shredded.  Several people pointed out that they won't eat shredded because of the additives in it.  Hmmm, really?  So off I go to check out my bag of cheese.  Lo and behold, I find that every bag has anti-caking agents, and a specific ingredient:  cellulose.

After doing a little research, I found that cellulose is one of the main components in the cell walls of plants.  This sounds a little reminescent of high school biology class.  Essentially, cellulose is all natural in that it comes from plant fibers.  However, it is highly processed and used in a number of food products, as anti-caking agent in cheese being one of them.  Granted, I suppose using cellulose is better than using something completely chemical, but still I don't think my cheese needs these "extra" ingredients.  If I want to eat plant fiber, I'll eat plant fiber.  I don't want it in my cheese.

So, from now on, I'll be purchasing blocks of cheese and grating them myself.  I don't have the cool attachment on my food processor to do it quickly, so I'll just do it by hand as needed.  Since cutting back on dairy to help Baby Girl's eczema, we don't need to be eating alot of cheese anyway.  Grating it myself will just be one of the ways to limit myself from wanting it all the time.  At least, that's what I'm telling myself.  :)

Friday, September 9, 2011

Preserving Nature's Bounty

It's no secret that I like to save money where I can.  One of the best ways is to preserve summer produce when it's plentiful so you can eat that food through the off-season.  Each year I garden in hopes that I will grow enough for us to eat through the summer and can or freeze it to have later.  It didn't work out this year the way I'd hoped.  We planted tomatoes, cucumber, zucchini, cantaloupe, green peppers and pumpkins.  Well we got 1 cucumber, 1 green pepper and enough grape tomatoes to keep our salad plates pretty but that's it.  I still hold out hope for the peppers, as they have several blooms but otherwise I think we're done.

I found roma tomatoes for $.99/pound and bought 5 pounds of those to dice for chili, hamburger helper and such.  I've also been buying strawberries any time I see them reasonably priced and making jam.  Unfortunately we go through that so quickly I think I only have 2 pints left.  That probably won't get us very far!  LOL

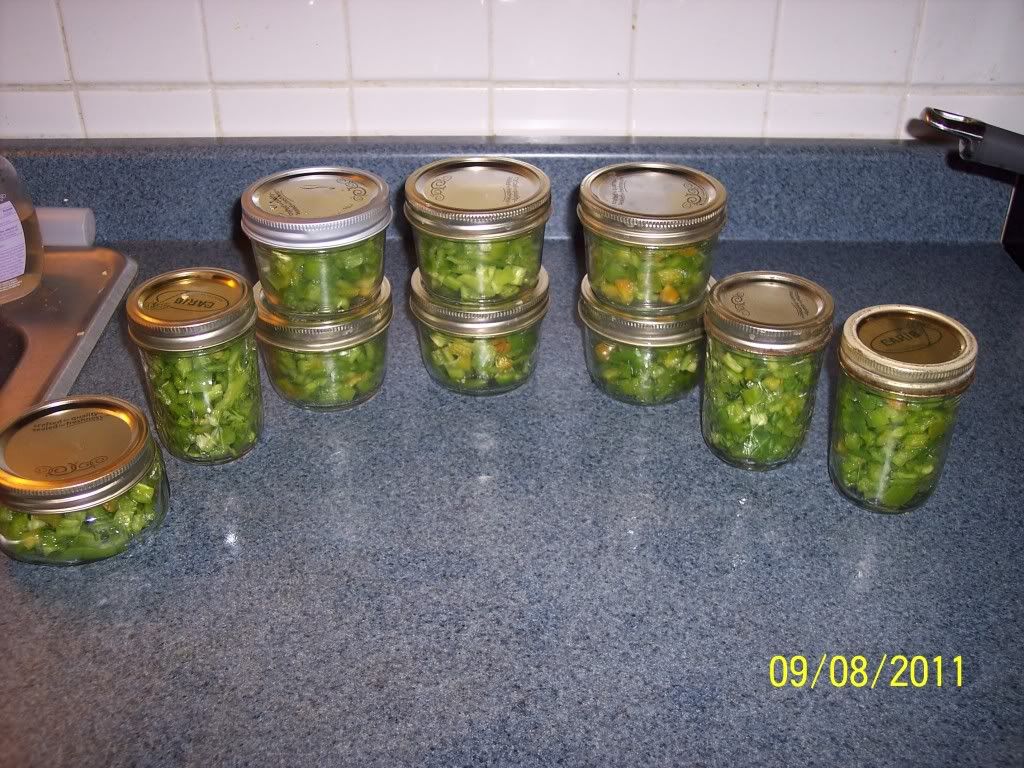
One of the things that has been in the back of my mind is green chilies.  I love white chicken chili and my recipe calls for an 8 oz. can of green chilies.  Since I ditched can goods a while back I've wondered what I'm going to do for the chilies.  I guessed that it would be expensive to buy 2-3 for each batch.  I searched for a jarred variety, but was unsuccessful.  I wasn't sure what I was going to do.  That is, until I was wandering the produce section the other night and found a great sale on Hatch chilies.  They were $1.68/pound.  I purchased 2 big bags.  At the checkout the guy couldn't find the code, so he gave me each bag for $1.68.  I did tell him that there was more than a pound in there, but he said it was too much trouble to figure it out in his head.  This would be the bonus of grocery shopping at 1 am! 

I headed home and planned to work on them the next night... and the next... and the next.  Well I finally got around to it last night and a few were mush (grrr!).  I cleaned up and diced everything that was good and managed to get 10-8 oz. jars of chilies.  I froze them just because the thought of getting the canner out at 10 pm wasn't appealing.  Hopefully they will work well in my chicken chli.  I figured I would saute them with the onions to get them soft.  That's the plan-if that doesn't work, I'll try something else.

As far as money goes, I spent $3.36 on the peppers.  I already had the jars, lids and rings, so no new expense there.  If I recall correctly, a 4 oz. can of chilies at the store was $.74.  So, multiplied by 20 (the amount of 4 oz. jars I would have), the total is $14.80.  I saved $11.44 by doing it myself, plus I have the added benefit of not having BPA in my chilies!  Woo-hoo!

Chicken with Wild Rice Soup

This week the weather is significantly cooler.  Thank goodness!  I don't mind the heat, but we've had a REALLY hot summer and 70 degree weather is a Godsend.  With the cooler weather, I was inspired to make soup.  Of course I couldn't just make any soup.  I made chicken with wild rice. 

For over half of my nearly 40 years, I didn't care for soup.  It was ok, but I would have much rather had a sandwich.  All that ended when I took a job at a local mall in college.  The smell of soup and freshly baked bread drifting down the center of the mall was intoxicating.  I became hooked on St. Louis Bread Company's (now Panera) chicken with wild rice soup.  I shudder to think of how much money I spent purchasing the "You Pick 2" special.  I tried two or three times to replicate the soup and finally gave up as the ingredients were expensive.

One day last year I happened upon this recipe.  It seemed like it might be a possibility.  It had things in it that I already had around the house or could pick up easily at the store so I gave it a whirl.  It was good-not as good as my beloved St. Louis Bread soup, but I decided that I could've built that up in my mind (it happens a lot to me).

This was before my "health kick," as my Mom affectionately calls it.  Pulling out the recipe the other day, I realized that I would have to make some alterations.  Here's what I ended up with.

4Tbsp. butter
1/4 cup flour
1 tsp. salt
3 cups milk, divided
4 medium potatoes, peeled and diced into 1/2" cubes
1 small onion, chopped
2 cloves of garlic
3 large carrots, peeled and sliced into coins
1 cup wild rice
3 cups of chicken broth (more if needed)
1/2 tsp. black pepper
1 very large chicken breast, cooked and diced


Begin by melting the butter in a medium saucepan.  Once butter is melted, add the flour and whisk it in allowing it to cook down for a few minutes (5 or so).  Add the salt and 2 cups of milk whisking vigorously to get rid of any lumps.  Allow to simmer until thickened, making a roux.  While that is thickening, prepare the veggies and throw them into the crockpot.  Add the rice, roux, 3 cups of chicken broth, pepper, and chicken pieces.  Stir thoroughly and cover.  Set crockpot on low and cook 7-8 hours.  I checked it every couple of hours and stirred it.  If the rice is taking too much liquid, you may need to add more chicken broth.  With about 30 minutes left before serving, add the remaining cup of milk and allow it to heat through.  You could use half-n-half here and it would make it creamier, but I didn't want to buy half-n-half.  It seems that when I do, it always goes bad or I'm scrambling around the day it expires looking for a way to use it.  The milk worked fine.

This amount fed the 5 of us dinner, our neighbor who recently had surgery, lunch for Hubby and the girls the next day and 3 breakfast portions for the girls before school.  I had grand notions of taking a beautiful picture to share, but when I got the bowl out of the fridge, this is what I found.  Sorry it isn't glamorous.

Wednesday, September 7, 2011

Week 35: Electricity!

Just typing that word makes me think of Schoolhouse Rock.  LOL

With lowering our water consumption last week, working on electricity this week shouldn't be a big shock.  My only issue is that with our water being reasonably cheap, I haven't tried to cut back on it before.  Our electric bill, on the other hand, gets out of control quickly, so I feel like we're making more of an effort there to start with.  I know that there's always room for improvement however, so that's where I'll start.

I have made a tour of the house and unplugged everything that was not of absolute necessity.  That would be the alarm clocks and lamp in our bedroom (the lamp is plugged in behind the bed and really not convenient to manually plug in every time), the phone in the kitchen and computer downstairs.  Then of course are the major appliances, but I don't plan on messing with those.  I unplugged everyone's nightlights and lamps and the can opener.  This raises the question, why do I have a can opener when I don't use canned goods?  And, why does it always need to be plugged in?  Ummm, I don't know and it doesn't.  So, one task for the week will be to remove the can opener from under the counter and Freecycle it.  Maybe it will help someone else out.

A few days ago, the weather cooled off to the point that I could shut off the air conditioning.  Woo-hoo!  I'm hoping to keep it off as long as possible and not turn the furnace on until at least November 1st (it runs on natural gas, but we are billed for both, so keeping both down is a priority).

This week I will be devising ways to keep our bill lower this winter.  This time of year, it is reasonably low, so long as neither the AC nor the furnace are running.  I am doing this now because if there is an upfront investment, I will need to save for it and I want a few weeks to plan what we can do so I don't dump a great big honey-do list in Hubby's lap.  He hates that!  I can do it a little at a time and he won't be quite so annoyed! :)

A little video, because I can't get that song out of my head!

Tuesday, September 6, 2011

Water consumption update

After a couple of exceptionally busy weeks, I think I'm back--for real.  It has just been crazy around my house and I've been running around like a crazy woman during naptime.  This is really my only time to blog, so if I fill up my time with cleaning, laundry or patting little one's backs so they drift off to sleep, then that leaves little blogging time. 

Last week I posted about a decrease in our income and how I was going to work to reduce water consumption.  I did do a few things and have implemented others.  First off, I filled a couple of 2 liter bottles and placed them in the toilet tanks.  The bottle displaced quite a bit of water and will now use less with each flush.  Along with that we are employing the "let it mellow" technique and simply do not flush unless it's necessary.  Please note (in case my daycare licensing rep. is reading) that I'm not doing this in the daycare area, only our family living quarters.  Although, I will say that it does happen occasionally anyway if I'm not standing over each child making sure that they remember to flush.  Such is life I guess.

Other areas where I'm trying to make sure to get the most bang for my water buck...
  • Use the water that I fill the cooler with when making yogurt to water the pepper plants on the deck.
  • Make sure the dishwasher and washing machine are full to capacity when running a load.
  • When hand washing pots and pans, I start with soapy water in the smallest pot and after washing, dump the soapy water into the next size pot and rinse the first pot over the second so I collect that water.  Continue as needed.
  • Take short showers (challenging with the girls-they love to take long, hot showers)
  • When brushing teeth, fill a small drinking cup about half full of water.  Dip toothbrush before brushing, and pour a bit on the toothbrush if needed.  Use the remaining water to rinse mouth and get a drink if needed.  The hope is that the kids can self regulate the amount of water they need to do their teeth.  If found that unless I was standing over them, they still let quite a bit of water run down the drain just trying to turn the knob off.
There are still a couple of other things that I need to explore further (or get Hubby on board)...
  • use grey water from washing machine and shower to flush the toilet or water garden (hoping to plant some fall veggies).
  • get a rain barrel going for things like washing the car or watering the lawn-although I think the season for that is over for the year.  If we could get it up and going by next summer, that would save us quite a bit of water I think.
That's about it for right now.  I'd love to hear from you if you do other things to save water.  I'm sort of new at this, so I'm sure there are tons of things that I could be doing that I'm not.
Related Posts Plugin for WordPress, Blogger...